
Vitis-Ai demo on ZCU104
Hardware
For the demo you will need a few things apart from the ZCU104 develipment board by Xilinx:
- micro USB cable
- Ethernet cable
- Supplied 12V, 5A power supply with 6p molex connector
- SD card (16GB or more)
All of these tools come with the official development kit.
Setup evaluation board
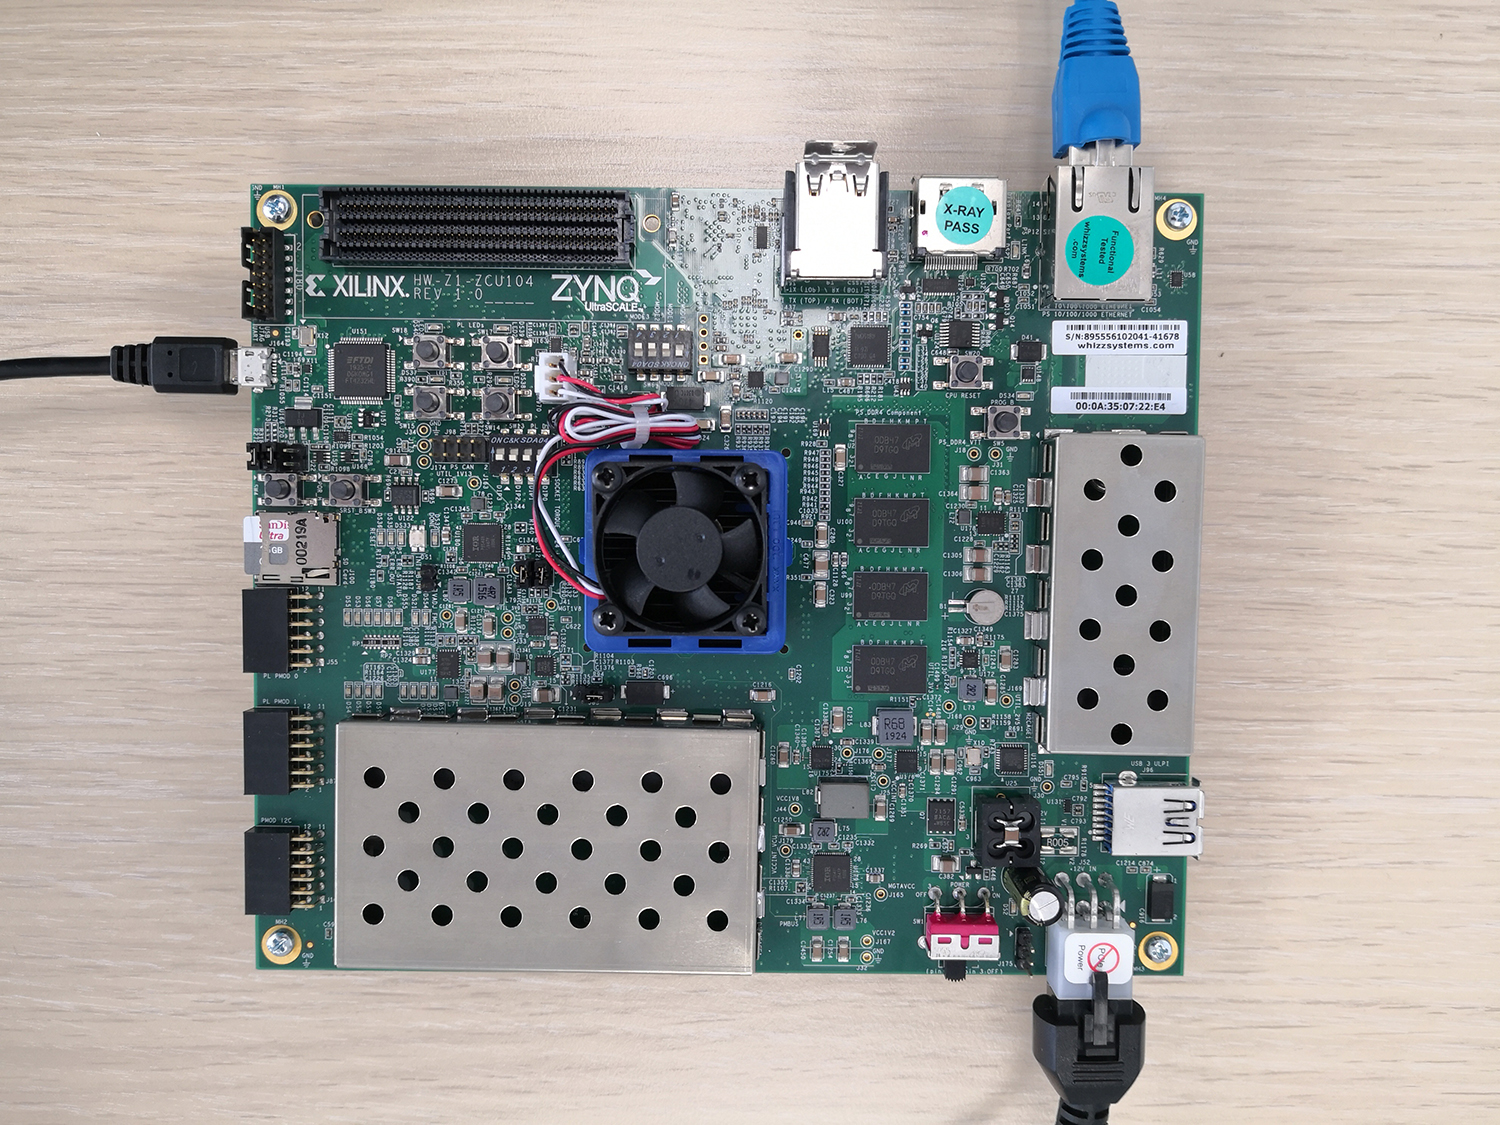
Following is the image of ZCU104 board with all connections for demonstations. This is the board orientation that is used for all location descriptions on the board.
Most important parts are:
- BOTTOM RIGHT: Power input and power switch
- TOP LEFT: USB-Uart micro usb connector
- MIDDLE LEFT: SD card slot
- TOP RIGHT: Ethernet port
- CENTER: SOC

Prepare petalinux image
Download petalinux image for ZCU104 which has already configured and preloaded Vitis-Ai libraries and models here.
Use software like Etcher(is cross platform) to flash downloaded xilinx-zcu104-dpu-v2020.2-v1.3.x.img.gz to an SD card of size 16GB or more.
Insert SD card in the slot on the evaluation board.
Set board to boot from SD card. On ZCU104 there is DIP switch with 4 switches labeled as SW6 above the SOC. Pins are numbered [1:4] with PCB layout labeled MODE[0:3]. Switch combination to boot from SD card is [ON, OFF, OFF, OFF], where OFF position is away from the SOC and ON position is towards the SOC. Image for reference:


Connect to the board
To communicate with the board use a micro USB cable and connect to the USB-Quad Serial interface on the left side of the board. Converter will be active even when the board is off as it is powered by the micro USB connector.

When connecting it to your computer you will get 4 new serial ports labeled COM[x1,x2,x3,x4] on Windows and /dev/ttyUSB[x:x+3] on linux. Only one of them is used as console in/out and will act as a terminal for petalinux. If you have no other serial devices plugged in you will get(on linux) ports labeled as /dev/ttyUSB[0:3] where the second one /dev/ttyUSB1 is used. If you have other serial devices on the computer, then disconnect them for the first connection or open 4 serial consoles with each one connected to one of the newly added ports. Active port will display lots of messages on board boot.
Connect to the board ports with UART settings:
- baud rate: 115200
- stop bits: 1
- parity: none
- word size: 8
For communication you can use Putty, which is cross platform and works with gui. For linux I like to use terminal based tool called tio, which can be installed on most distributions, including ubuntu and fedora:
# Ubuntusudo apt install tio# Fedorasudo dnf install tio |
To connect to a serial port at a specific baud rate with tio:
tio -b <baud_rate> -d <word_length> -s <stop_bits> -p <parity> /dev/ttyUSB<x># Example for ZCU104 (no other serial ports connected):tio -b 115200 -d 8 -s 1 -p none /dev/ttyUSB1# To exit type: Ctrl+T, Q |
Option -d sets word length to 8 bits, -s sets stop bits to 1 and -p sets parity to none. These options are already default in tio, but this makes it more obvious and explicit.
Power up the board
When everything is connected and the serial console is connected and running, connect the power to the board and slide the on switch on the bottom right corner to the right. Nearby green power LED will turn on and a bunch more on the middle left side of the board indicating states of power supply rails. If any LEDs are off, there might be problems witht the board.

The Big LED near the SD card slot will start as RED and will turn GREEN when the bootloader starts. You will see kernel output on the serial console. Once it is finished, the system will auto login as root user. If not, it will promt you for user. Use login user root with password root. When the credentials are entered you will be located in root user directory /home/root/ also labeled as ~/. Since you are logged in as root, you will not need to use sudo when configuring system files and settings. Be careful not to delete important files. Also note that installed text editor is vi. If you’re unfamiliar with it, check out this article so you will be able to create, modify and save files and of course exit vi.
Set up board for SSH connection
It is easier and faster to use the board over ssh by connecting the board via local network. It will also allow you to transfer files to it.
First change board hostname:
hostname <new_hostname># I named it zcu104:hostname zcu104 |
Lastly change new hostname in /etc/hostname to the new hostname and change new hostname for local ip in /etc/hosts. Edit last line hostname by the ip of 127.0.1.1. File should look like this:
127.0.0.1 localhost.localdomain localhost# The following lines are desirable for IPv6 capable hosts::1 localhost ip6-localhost ip6-loopbackfe00::0 ip6-localnetff00::0 ip6-mcastprefixff02::1 ip6-allnodesff02::2 ip6-allrouters127.0.1.1 zcu104 |
Next it’s advisable to set static IP for the board if you’re running the board connected to your PC or local network. If you will use DHCP then skip this step.
For this example my computer is directly connected to the board with PC static IP address 10.0.0.2 with local network as 10.0.0.0/24. For the board I chose IP address: 10.0.0.50. If you were connected to a router you would have to use it’s IP address as a base.
Edit file /etc/network/interfaces and navigate to following two lines:
auto eth0iface eth0 inet dhcp |
Replace word dhcp with static and add 5 lines (with appropriate IP addresses) so it looks like this (in my case):
auto eth0iface eth0 inet static address 10.0.0.50 broadcast 10.0.0.255 network 10.0.0.0 gateway 10.0.0.1 netmask 255.255.255.0 |
Add your chosen IP and hostname to end of /etc/hosts
10.0.0.50 zcu104 |
(if you didn’t configure static IP, you can continue reading from here)
When finished restart the board by typing:
reboot# orshutdown -r now |
Now you can ssh on your board using a console with user root on chosen IP address (and on port 22). Once again Putty can be used, but on linux you can connect using ssh tool:
ssh -X root@<ip_of_board># My example:ssh -X root@10.0.0.50 |
The argument -X is used to forward X11 server; ie. to display pictures and videos played on the board.
To disconnect from ssh either close the application or in linux use shortct Ctrl+D. This however will not shutdown the device, only close the connection to it.
Following is output from terminal when connecting to the board for the first time. If it asks you Are you sure you want to continue connecting just type in yes.
[matej@fedora ~]$ ssh root@10.0.0.50The authenticity of host '10.0.0.50 (10.0.0.50)' can't be established.RSA key fingerprint is SHA256:z0Phrs941ecvqVqBbS3NUPGf0LhrWYYIEcidHxZHik4.This key is not known by any other namesAre you sure you want to continue connecting (yes/no/[fingerprint])? yesWarning: Permanently added '10.0.0.50' (RSA) to the list of known hosts.root@10.0.0.50's password: root@zcu104:~# lltotal 8drwxr-xr-x 3 root root 4096 Dec 13 13:01 Vitis-AIdrwxr-xr-x 3 root root 4096 Dec 13 13:01 dpu_sw_optimize |
Shutdown
To power off the board, shut it down first with command:
shutdown -h now |
On ssh you will loose connection soon, but the system will not be off yet. Observe the previously mentioned BIG LED near the SD card slot. When it turns from GREEN to RED it means, that the operating system has shut down. You can turn off the board using the power switch by moving it to the left.
On serial connection you will be able to see kernel output when shutting down . When you get a message reboot: Power down, the board has powered down and you can turn it off.
Transfer files
Now that ssh is established you can use scp to transfer files between devices. To transfer file to the evaluation board run. Use argument -r to transfer files inside a folder recursively; ie. when you want to copy a folder along with all files inside of it.
scp <-r> <path_to_file_or_folder> root@<board_ip>:<path_on_board># Example copying an image from a folder on PC to home folder on the board:scp ~/Pictures/picture.jpg root@10.0.0.50:~/# picture.jpg now exists on board in: ~/picture.jpg or /home/root/picture.jpg |
Same exact way is from the board to the PC (it has to have ssh port 22 enabled).
scp <-r> <path_to_file_or_folder_on_ZCU104> <pc_user>@<pc_ip>:<path_on_pc># Example copying .bashrc on root from board to my pc documentsscp ~/.bashrc matej@10.0.0.50:~/Documents |
Vitis-Ai demo setup
Vitis-Ai libraries are already installed on the system along with the demo board image.
Vitis runtime is also installed by default, but you can also update it or install it manualy if needed. Download it here.
Extract the file and copy subfolder vitis-ai-runtime-1.3.x/aarch64/centos to board root folder:
scp -r vitis-ai-runtime-1.3.x/aarch64/centos root@<board_ip>:~/# My example:scp -r vitis-ai-runtime-1.3.2/aarch64/centos root@<10.0.0.50>:~/ |
Run the setup script:
bash ~/centos/setup.sh |
Finally download and install pictures and videos for the examples here. Transfer archive to the board and extract it there into existing Vitis-AI folder:
scp vitis_ai_runtime_r1.3.x_image_video.tar.gz root@<board_ip>:~/cd ~/tar -xzvf vitis_ai_runtime_r*1.3*_image_video.tar.gz -C Vitis-AI/demo/VART |
You can then add your own images and videos into these folders of type .jpg and .webm.
Running demo applications
All demo applications are already included on the board in ~/Vitis-AI along with pre built models in /usr/share/vitis_ai_library/models. Model files are of type .xmodel. Demo applications are located in ~/Vitis-AI/demo/VART which will be used as “root directory” when referring to files and folders in future examples.
resnet50 – image recognition
Located in resnet50/, it takes images located in folder images and tries to map each one to a line of words located in text file resnet50/words.txt. For each image it displays it on the screen (if connected with ssh -X) along with 5 different results with probability number from 0-1.
Run the example inside directory resnet50 with path to trained model of type resnet50.xmodel:
./resnet50 /usr/share/vitis_ai_library/models/resnet50/resnet50.xmodel |
Here is an example of the output for 4 images of a monkey(macaque), brain coral(already provided), dolphin and banana (004.jpg, 001.jpg, 003.jpg, 004.jpg):
root@zcu104:~/Vitis-AI/demo/VART/resnet50# ./resnet50 /usr/share/vitis_ai_library/models/resnet50/resnet50.xmodel WARNING: Logging before InitGoogleLogging() is written to STDERRI1216 19:50:52.233042 1066 main.cc:285] create running for subgraph: subgraph_conv1Image : 004.jpgtop[0] prob = 0.892722 name = macaquetop[1] prob = 0.044446 name = titi, titi monkeytop[2] prob = 0.034615 name = marmosettop[3] prob = 0.012734 name = mongoosetop[4] prob = 0.004685 name = guenon, guenon monkeyGtk-Message: 19:50:53.144: Failed to load module "canberra-gtk-module"Gtk-Message: 19:50:53.145: Failed to load module "pk-gtk-module"Gtk-Message: 19:50:53.166: Failed to load module "canberra-gtk-module"Gtk-Message: 19:50:53.167: Failed to load module "pk-gtk-module"Image : 001.jpgtop[0] prob = 0.980779 name = brain coraltop[1] prob = 0.008485 name = coral reeftop[2] prob = 0.008485 name = jackfruit, jak, jacktop[3] prob = 0.000542 name = sea urchintop[4] prob = 0.000422 name = puffer, pufferfish, blowfish, globefishImage : 003.jpgtop[0] prob = 0.466774 name = great white shark, white shark, man-eater, man-eating shark, Carcharodon carchariastop[1] prob = 0.171716 name = tiger shark, Galeocerdo cuvieritop[2] prob = 0.133733 name = dugong, Dugong dugontop[3] prob = 0.049198 name = killer whale, killer, orca, grampus, sea wolf, Orcinus orcatop[4] prob = 0.049198 name = albatross, mollymawkImage : 002.jpgtop[0] prob = 0.999820 name = bananatop[1] prob = 0.000096 name = lemontop[2] prob = 0.000045 name = spaghetti squashtop[3] prob = 0.000021 name = orangetop[4] prob = 0.000010 name = slug |
When opening the first image you will likely get Gtk-Messages which are related to missing libraries for playing sounds. For these demos it is not needed and warnings can be ignored.
video_analysis – traffic recognition
Located in video_analysis/, it takes a video from subfolder video_analysis/video/structure.webm and model ssd_traffic_pruned_0_9.xmodel and draws boxed around people and vehicles.
Run the example inside video_analysis
root@zcu104:~/Vitis-AI/demo/VART/video_analysis# ./video_analysis video/structure.webm /usr/share/vitis_ai_library/models/ssd_traffic_pruned_0_9/ssd_traffic_pruned_0_9.xmodel |
Once again you might get some Gtk related errors that you can ignore as long as video recognition is playing.
References
More information is available on Github.