One-click Environments with Docker can Ease a Developer’s Life

- Images courtesy of Docker Inc.
At Cosylab, we are striving to use docker images more extensively both in development and testing, and they have proven to be very useful in getting a software team up and running on a project quickly.
One-Click Environment
When you start working on a new project, the first step is to set up your development environment. But how is this typically done? The best-case scenario is that you talk with Project Managers on smaller projects, or to the Tech Lead or Lead Developer on larger projects – and receive from them an external hard drive with a 100 GB virtual machine that you then install on your laptop. The worst-case scenario is that you have to create a fresh virtual machine by installing everything from scratch according to written specifications for another project.
However, neither of these paths are ideal. A developer shouldn’t need to search for an existing virtual machine or – heaven forbid – install the environment manually from scratch. A better solution is to have an environment that every developer can re-create with a single click. For this purpose, we often use Docker, a solution that has several advantages over virtual machines.
The Docker Container
A quick clarification of the terminology used here: When you are creating a Docker environment, you begin by writing a text file named “Dockerfile”. Using this file, you then build an environment “template” called the Docker Image. When you decide you would like to create the environment, you use the Docker Image to produce the Docker Container. You can run the latter, attach a terminal to it and communicate with it through a network.
While Docker isn’t the one-and-only silver bullet for your project, it does have several advantages over using virtual machines.
- In general, Docker Images take up less disk space. You don’t need to store all the clutter that accompanies virtual machines.
- The development environment is documented in code instead of in a Word document that is more often than not out of date. Every developer can open the Dockerfile and inspect the creation details of the environment. Since the code is the documentation, changing the environment, by definition, also changes the documentation.
- You can build new images on top of the existing images.
- You have an immutable environment. Once you destroy a Docker Container, all your changes to the container are lost. Many would claim that this is a drawback, but it is actually a feature of Docker Containers. Immutability encourages the team to modify the Dockerfile for any necessary changes, which avoids the “works on my machine” issue.
- Versioning is easy, as you can create a tag as you would in Git.
- Updating the environment is also unproblematic, being merely one “docker pull” away.
Docker, however, does have a few disadvantages:
- Setting up a virtual machine from scratch is more straightforward than dealing with Dockerfiles.
- While you can install Docker on Windows, it isn’t that easy. You will need to enable Hyper-V, which will, in turn, prevent virtual machines in Virtualbox from working.
Docker Compose
Docker Compose is a tool for defining and running multi-container Docker applications. Docker, in combination with Docker Compose, is uniquely qualified for one-click environments. You can specify any number of services, volumes, exposed ports and environment variables. You only have to check out the code and run “docker-compose up”, and you have the environment running.
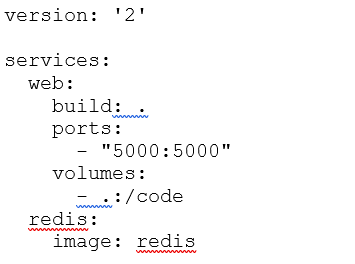
The example in Listing 1 shows a Docker Compose file, which starts an instance of a Redis service for data storage and an instance of a web server. The letter gets built from the local Dockerfile, using the local source code and listens on port 5000.

Listing 1: Example of a Docker Compose file
Creating a Docker Image
You build the Docker Image from the Dockerfile, which describes the base image used for your new image and adds additional packages and files. The Dockerfile also describes how the packages are configured. You can find details on how to create a Dockerfile online. Personally, I have always referred to the official Docker documentation. You can find an excellent example of a Docker file at https://docs.docker.com/get-started/part2/.
Once you have the Dockerfile ready, you can build the image to use it locally, with the command docker build -t myapp:v1. The latter produces a Docker Image from the Dockerfile stored in the working directory – to be used locally – and tags the image with the name “myapp”.
Using Docker
You can use many modern IDEs and text editors for development alongside Docker Containers. I don’t have any experience with this aspect, so I suggest you look at the documentation for your preferred tools regarding this. However, I propose several straightforward ways you can use a Docker Container for development.
Volumes and Shells
One way to develop applications with Docker is to mount a volume and run the build and application using a shell.
Mounting a volume means that files stored on your host machine are also accessible inside the Docker Container – by specifying the directories to mount in the Docker Compose file. Most images contain a folder that is reserved for the source code. In this instance, it shouldn’t be necessary, since you will be attaching a terminal to the container anyway. You can now edit the code using any editor installed on your host by modifying the local files.
Attach a shell to the running Docker Container using the “docker attach” command, and utilise the shell to build and run the application.
IDE inside a Container
Another great alternative is to install the IDE inside the Docker Container. You can then launch the IDE and use it to edit, build and execute your code. This approach, however, requires you to have X11 forwarding working. On Linux, this works out of the box. On Windows, you will need to install an X11 server (e.g. Xming) and configure the appropriate display inside the container: export DISPLAY=192.168.0.2:0. Your actual IP address and display number will, of course, depend on your specific setup.
Using the Image for Continuous Integration (CI)
Ideally, you would use the same Docker Image for CI. By employing only one image for both development and CI, you will ensure that the environment is always up-to-date and that the code works for all developers.
Conclusion
A one-click environment using Docker isn’t a magic bullet that will solve all your problems. Nevertheless, it will make things easier by ensuring more consistent development environments in a team. For example, Docker Compose can do quite some impressive tricks. At Cosylab, we run quite a lot of our software modules in docker containers, coordinated by Docker Compose. Once you set this up, you achieve an (almost) one-click install.
The Docker + Compose combination can also be useful for supporting the development of web applications. Such setups can include Nginx and an application container, for example, with PHP/Ruby/Python + DB + MailCatcher + a CSS/JS builder.
There is a caveat, of course, as with all things in life. Docker works better on Linux and to use it in a Microsoft Windows environment it’s best to virtualise it, as I mentioned. One of the more straightforward paths to the former is to install an Ubuntu VM inside Virtualbox.
While Docker may seem complicated and different compared to the virtual machines that some of you may know better, I believe it’s a worthwhile investment of time to investigate the “Docker option” further.
About the Author
Domen Soklič is a Software Engineer and Project Manager at Cosylab, where he primarily works with institutes in the field of Big Physics and with the European Space Agency to develop software for the betterment of humankind.
His expertise includes a wide range of applications, from low-device device integrations to high-level desktop and web user applications.
In his free time, Domen enjoys cycling, walks, and tinkering with electronics. Recently, Domen has discovered that home automation can also be interesting.
Most of all, Domen enjoys optimising things to make them work more intelligently and requiring less effort to develop and maintain.

