A Human Machine Interface fit for SCADA
Bespoke GUIs for SCADA?
Human Machine Interfaces (HMIs) are what the operators use in the control room to supervise and manage the industrial or scientific control system. In essence, they are the graphical user interfaces and the underlying logic that help operators achieve high-level supervisory management.
It makes little sense to create customised GUIs for specific SCADA projects every time from scratch. It does make sense to use a software framework or tool-set that enables the developer team to reuse the GUI logic and layout from one project to the other as much as possible.
Furthermore, in today’s world of mobile applications and cloud-based web solutions, users have become familiar with the all-pervasive new “look and feel” of modern GUIs aimed at the mass user market and based on usability studies.
Beckhoff TwinCAT HMI to the Rescue!
When we started a recent new project, we were faced with the dilemma of which tool to choose for HMI development that would guarantee long-time support and reusability.
The visualisation solution that comes with TwinCAT 3 and produces application running on the PLC was running out of support. As its successor, Beckhoff introduced TC3 HMI (human-machine interface). The latter is a new industry solution for a modern web-oriented HMI which comes in two packages:
- * TE2000 – TC3 HMI Engineering, and
- * TF2000 – TC3 HMI Server.
The TC3 HMI Server is the webserver on which the HMI application (developed with the TC3 HMI Engineering) can be published and served as a web page. It connects to the PLC on one side and serves the web browser that renders the content to the user. Even though the solution was initially not quite stable yet for our purposes, we chose the latter but promised support and fast release cycles with updates. We accomplished most of the engineering work with the TC3 HMI Engineering package, publishing it on TC3 HMI Server.
TC3 HMI Engineering (TE2000)
The engineering tool, TE2000, comes as a Visual Studio extension. In the beginning, it gave us some hard times regarding stability and occasional corruption of project files. Things got better with the tool’s updates, and Git also turned out to be of great help. Putting aside TE2000’s teething problems, we grew to know the tool as a complex environment with a rich set of possibilities and a user interface with many buttons, tabs and dialogues. The learning curve was steep, and the changes consumed time. Luckily, TE2000 has features that support the object-oriented approach.
What I will present
I will describe some practices I found helpful in speeding up HMI construction by taking the object-oriented approach and reducing the number of buttons (clicks) and dialogues. Secondly, I will present specific controls that we find essential, are complex to use, or both. In the end, I will discuss an example of binding/mapping the process variables and commands from PLC to the HMI. The main goal there will be to “define once and reuse many times”. This way, your code will be more robust and easier to maintain.
Good practices
CSS classes
By employing CSS classes, we can avoid defining the style properties like colors and borders directly for each control. When using CSS classes and putting them on the controls property list (i.e. Common->ClassNames of type ClassNameList) it is much easier to change the whole list once than changing several color properties on an event (i.e. status change).
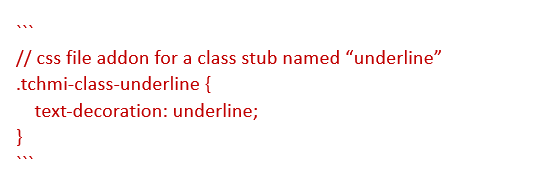
In some cases (e.g., rotate spinner, hide password, underline text decoration) IDE gets a bit short with its property list. It helped me to add a CSS class as a stub to be able to set it to the components from IDE and target its elements on the web page using the code behind, from a CSS file or JavaScript. Classes defined in Themes will have different names on the page, where are prefixed with “tchmi-class-“.
Internal symbols
Internal symbols can be used as internal variables or constants. I made a lot of use of internal symbols and bound them to more properties or controls. If need be, we could change all of them in one spot. The latter was handy even for defining the CSS lists from previous cases.
Localisation
Using the Localisation feature, we can access all texts shown to the user in one file, making it possible to share and change the textual corpus easily.
UserControls
User Controls (UC) enable you to create custom made controls of any complexity. Whenever you need common elements of the same look, behaviour or logic in the code behind (underlying code), UC is the way to go. Even when we need to build a single complex component (e.g. tab, separator, IO presentation, status indicator, progress bar with embedded customised LinearGauge), it breaks the complexity into more manageable parts. Most importantly, you can produce a code of higher quality and save time doing so.
Action Templates
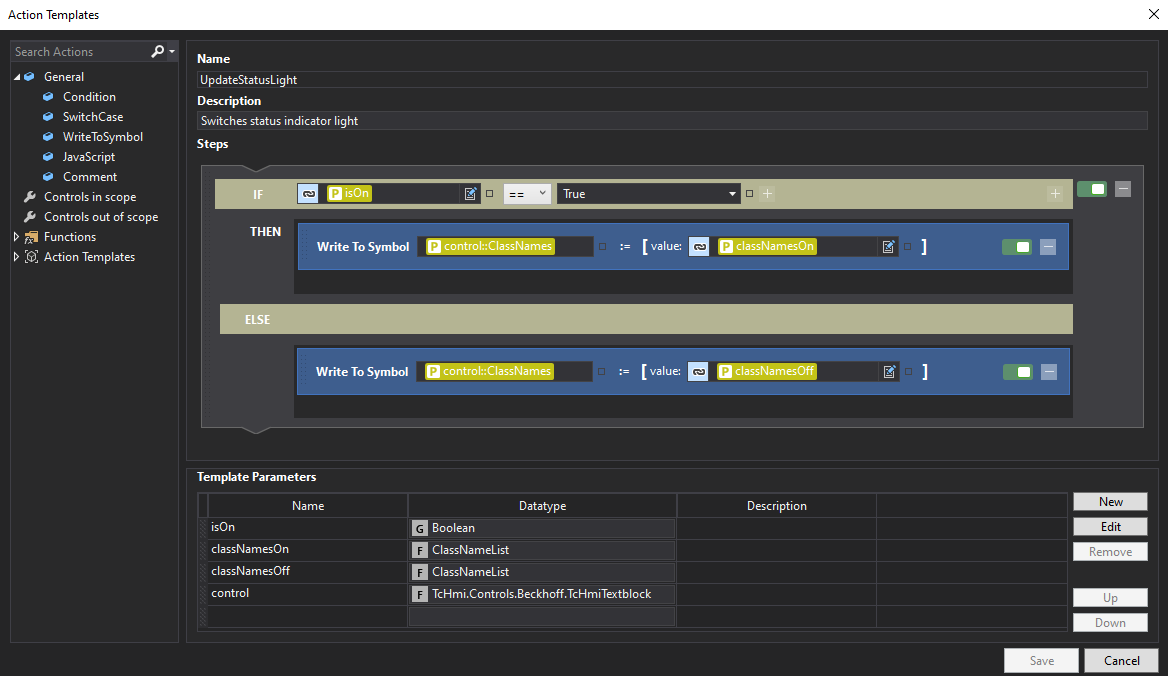
With Action Templates, we can construct behaviour logic the same way as the action on a control triggered by an event. The template is the generalisation of an action, with parameters that you can reuse as a one-liner in any control action sequence. To add the parameters, you use the “TwinCAT HMI Configuration” window.
Functions
We can add functions as items on the project tree, which comes in a JavaScript or TypeScript code variant. Each item comes with two files: the function placeholder and the JSON configuration file for metadata. Functions are potent; in the script, you can use TwinCAT HMI API with many possibilities. We can bind these methods to properties, create components and change their behaviour.
Some functions (e.g.: Functions->Data Conversion) are included in the framework. All of them can be employed for property bindings, but we can use only those with at least one attribute to format data in tables (TcHmiDataGrid).
Bindings
We can use Bindings with JavaScript methods added to a symbol for fast formatting.

GUI controls and containers
To see the list of controls, open the Toolbox window. Among the most important are the following.
- Inputs
- TextBox was the only input type control available until the latest version (1.12.744.3), which added SpinBox, Numeric and Password input.
To play it safe and usable, we often need some checking and formatting. That is why it is good to have the input wrapped in a user control where the actual input component can be replaced or changed by the logic behind it without breaking the outer bindings.
- TextBox was the only input type control available until the latest version (1.12.744.3), which added SpinBox, Numeric and Password input.
- Containers
- Grid is the most diverse container. It supports responsive design and makes light work of element positioning into rows and columns or component placing in the middle (image reference, custom dialogues …). Now that I know, I wish I had first mastered the Grid.

Grid
- Region is an area where a Content is placed. It enables the creation and management of tabs and scroll bars.
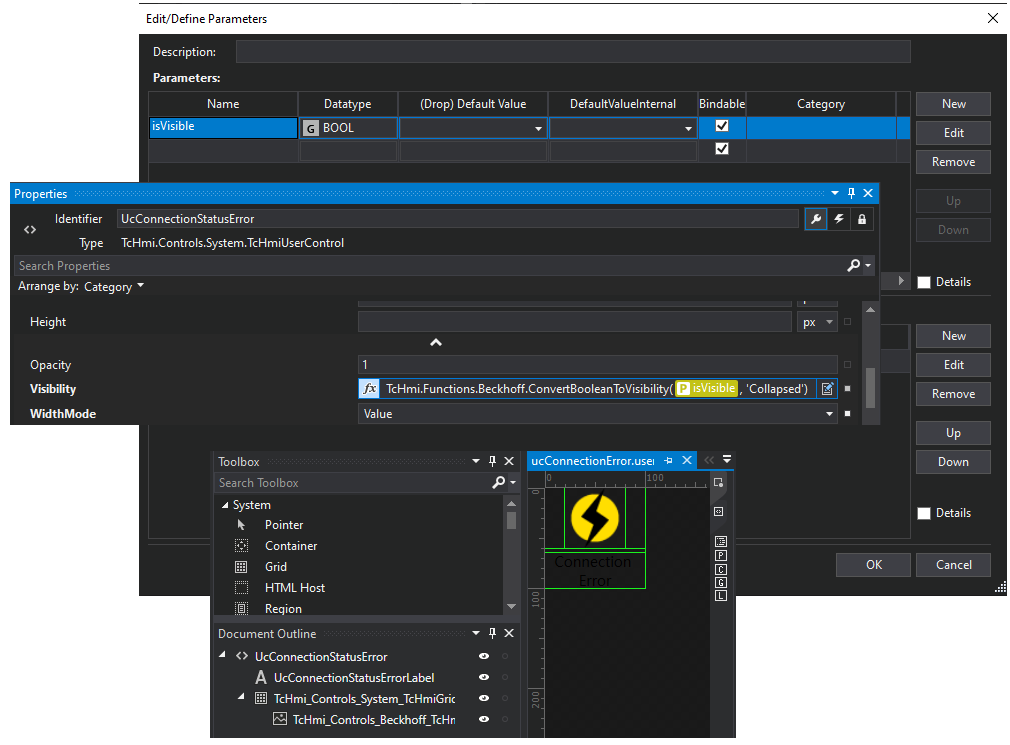
- Let’s see an example of how we can create a User Control (UC) to signal a connection error. The UC shall display an image with notification text under it, but only when its parameter ‘isVisible’ is set to true.
A UC comes with a JSON metadata file that defines its input parameters. We manage the latter by the “Edit/Define Parameters” dialogue to add the parameter ‘isVisible’. The parameter is then used in UC “Property” window for function binding to its visibility property.
- Grid is the most diverse container. It supports responsive design and makes light work of element positioning into rows and columns or component placing in the middle (image reference, custom dialogues …). Now that I know, I wish I had first mastered the Grid.
Mapping data from/to the PLC process
Since the PLC and HMI applications are entirely different applications, we have to map their information models. The TwinCAT Automation Device Specification (ADS) is utilised for communication. When the PLC runs, it provides all data (even private) from the PLC, except the pointers and references.
As I did not want my code to possibly interfere with the others team-members’ code, I chose to implement a bridge function with blocks and data types through which I could connect the two applications. I deposited them nicely in an “HMI” folder.
The latter also brought benefits for future demands, such as:
- adapting the data format to the specifications of the HMI (e.g., arrays for table representation);
- code refactoring;
- calling commands.
Code refactoring can be done with the IDE, but only inside one project and may break the mapping to the HMI. The bridge I created simplifies the management of code changes on both sides simultaneously and independently with updates of the core program. This could be a time saver if we own the data model on both sides of the mapping (PLC/HMI) since we reduce the need to update the HMI bindings.
We can perform mapping automatically when we bind control properties by selecting data from the PLC in a dialogue. Although this seems handy, I found it to be suboptimal. A better way for me was to prepare the data in an HMI bridge function block and map the complete block. Then I copied/pasted or picked/dropped from the “TwinCAT HMI Configuration” window. Work was much pleasanter and smoother without pop-ups and heavy dialogue loadings. Also, the broken mappings caused by changes on the PLC side are well visible and can be fixed with the remapping of the whole block at once. I have to mention that auto-generated symbol names are slightly different in the latter case. The system creates the symbol references as a path of the mapped element nodes by connecting the node names with a dot (.), but the inner elements are accessible by double colon (::).
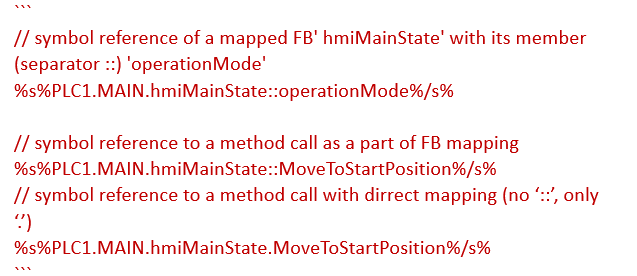
To call a method is not trivial, and I had some headaches at the beginning regarding this. First, we have to add a method on the PLC’s FB with an attribute “TcRpcEnable” and it must have at least one input variable.

Then I remapped the FB mapping on the HMI project to get the symbol references and added a JavaScript function.
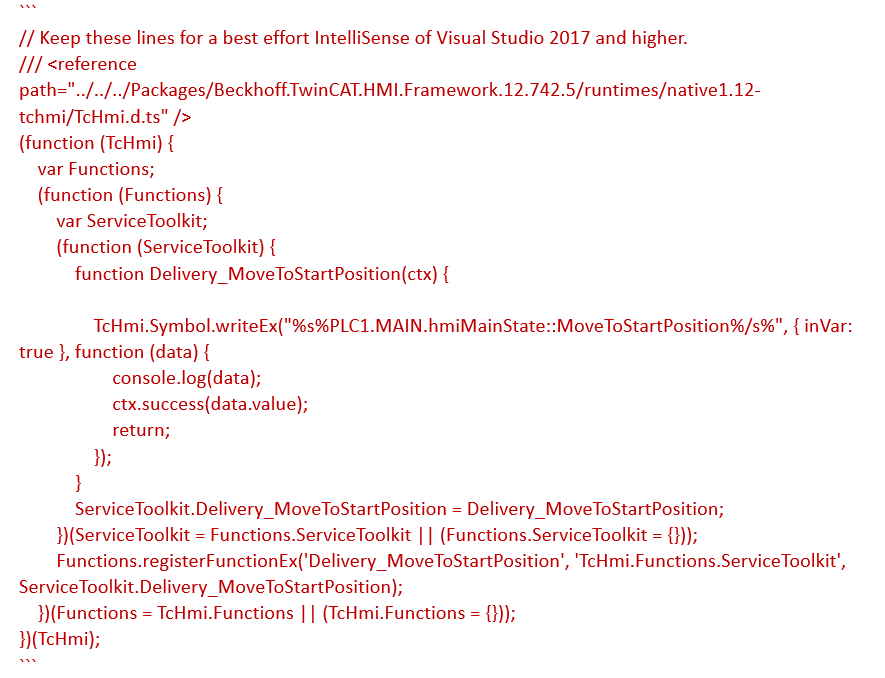
Code from the example is all we need to call a method from the HMI. You receive nice feedback of (un)successful execution when they are addressed with valid symbol reference, but the approach comes with some pitfalls. It seems that the method call is executed as an interrupt in a different context from the one the PLC tasks are running in. I am guessing this based on not being able to produce logs, and in some cases, experiencing some PLC task execution issues. That is why we want to have these method calls “fast and light”, sometimes only to trigger a local variable and handle the rest in a scheduled task. Furthermore, debugging with breakpoints is impossible, so instead, we have to utilise local test variables.
Conclusion
The Beckhoff TC3 HMI is a (welcome) beast of a framework, but you need to acquaint yourself with it before becoming productive. The product is not perfect, but it is evolving rapidly, gaining new features, and getting open issues fixed. It helps a lot to have some basic web development knowledge (HTML, CSS, JavaScript). The framework opens windows of possibilities for creating refined user interfaces and experiences.
At times, the additional layer of complexity that TC3 HMI adds on the top of your base PLC programming may be more challenging than you expected. I had to invest more learning time in TC3 HMI and its IDE issues than I counted on, but in the end, I was pleased. I can now adapt the look and feel of my project’s UI to the customer’s needs faster and tidier!
ABOUT THE AUTHOR
Uros Malensek is currently a developer in the Product Department at Cosylab. In the past fifteen years, he has also served as an embedded system developer in telecommunications and in the automation of power-grid substations. In his free time, Uros mainly combines his activities with family needs and pursues volleyball and basketball.


